Configuring IP address detection
It's crucial for WP Cerber to detect all IP addresses correctly.
On some web servers, WP Cerber cannot detect IP addresses automatically due to a non-standard server configuration or running the website behind a reverse proxy. That means WP Cerber is unable to protect your website and can even lock you out of your WordPress dashboard.
Is your website behind a proxy?
A reverse proxy is a specialized web server that sits in front of a web server and forwards client requests to websites hosted on the web server.
First of all, try to enable My site is behind a reverse proxy in the Main Settings and check how WP Cerber detects IP addresses as described below. Keep in mind that enabling this setting poses a security risk if your website is not behind a proxy.
Make sure that WP Cerber detects IP addresses correctly
- Open the What is my IP address page in your browser
- Open a second browser tab (window) and go to the Tools / Diagnostic tab of your WP Cerber installation on your website.
- Find the “Your IP address is detected as” row in the “System Info” section.
- Compare the IP address on the What is my IP address page to the IP address shown in the “Your IP address is detected as” row. If you see two identical IP addresses, WP Cerber has configured correctly. Otherwise, follow the steps below.
What’s next?
If after enabling My site is behind a reverse proxy WP Cerber does not detect IP addresses correctly, you have to define a special CERBER_IP_KEY constant in the wp-config.php file. WP Cerber will use it as a key to obtain IP addresses from the $_SERVER variable. See the instruction below.
Configuring the CERBER_IP_KEY constant
- Get your current IP address on the What is my IP address page
- Go to the Tools admin page which is under the WP Cerber admin menu and click the Diagnostic tab
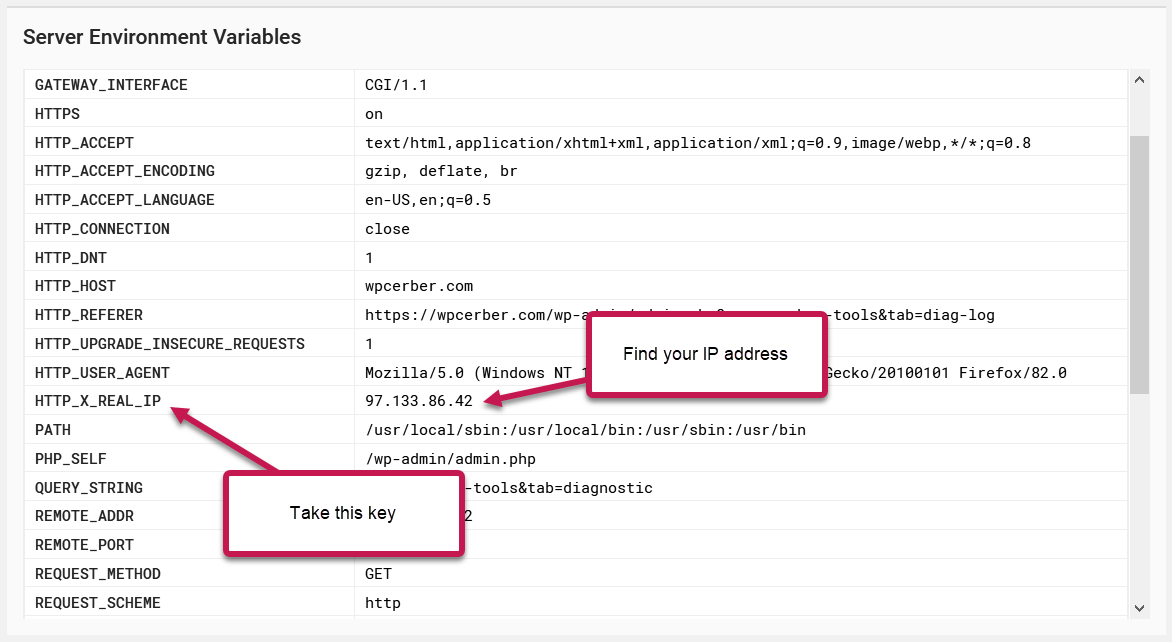
- Scroll down to the Server Environment Variables section
- Find your IP address in one of the rows that are displayed in the section
- In the first cell of the row with your IP address, you’ll see a key. On the example below, the key is HTTP_X_REAL_IP. We advise use a key that does not begin with HTTP_. Use such a key as a last resort.
- Take the key and add the following line with your key to the beginning of the wp-config.php file (after the line with <?php)
define('CERBER_IP_KEY', 'HTTP_X_REAL_IP' );
Note: The HTTP_X_REAL_IP is shown as an example, you have to find out and use your own key.
Security implications of using the “X-Forwarded-For” HTTP header
If My site is behind a reverse proxy is enabled, WP Cerber uses the “X-Forwarded-For” (XFF) HTTP header to detect the original client IP address in situations where requests to a website passes through a reverse proxy server or a load balancer, for instance, a Cloudflare proxy. In the context of using access control lists (ACL) based on IP addresses such as WP Cerber ACL, using the XFF header can have security implications if not configured properly.
If My site is behind a reverse proxy is enabled on a website that is not behind a proxy server, an attacker can forge the XFF header in a request and so can bypass the ACL rules if the attacker knows the access lists entries. Why? The attacker can set the XFF header to an IP address that is allowed by the access lists rules, allowing them to gain unauthorized access.
To mitigate this risk, it is important to enable My site is behind a reverse proxy on a website connected to the Internet via a proxy server only.
Have any questions?
If you have a question regarding WordPress security or WP Cerber, leave them in the comments section below or get them answered here: G2.COM/WPCerber.
