Dodatek Cloudflare dla WP Cerber
English version: Cloudflare add-on for WP Cerber
Ten opcjonalny dodatek zapewnia dodatkowe zabezpieczenie WordPressa poprzez integrację z chmurową zaporą sieciową Cloudflare. Po włączeniu, stale dodaje i usuwa adresy IP blokowane przez WP Cerber do i z reguł dostępu IP Cloudflare. Zapobiega to dostępowi złośliwych adresów IP do całej witryny na poziomie sieci. Aby korzystać z tego dodatku, musisz posiadać bezpłatne lub płatne konto Cloudflare oraz WP Cerber w wersji 9.6.3 lub nowszej.
Kiedy używać dodatku Cloudflare
- Jeśli posiadasz już konto Cloudflare i używasz zapory Cloudflare do ochrony swojej witryny
- Jeśli Twoja witryna internetowa jest stale narażona na liczne ataki cybernetyczne i chcesz zmniejszyć obciążenie serwera
Nie zapominaj o następujących wadach: konieczności delegowania domeny na serwery nazw Cloudflare i certyfikatu SSL na serwery internetowe Cloudflare; ponadto musisz zaakceptować konieczność przetwarzania swoich prywatnych danych i danych osobowych swoich klientów na serwerach internetowych Cloudflare w formie niezaszyfrowanej.
Ostrzeżenie: ten dodatek nie jest polecany początkującym. Możesz łatwo zablokować sobie dostęp lub zablokować swoich użytkowników.
Jak zainstalować dodatek
Dodatek jest standardową wtyczką WordPress i można go pobrać bezpłatnie z naszej strony internetowej. Postępuj zgodnie z instrukcjami na końcu tej strony. Po aktywacji wtyczki pojawi się następująca strona ustawień. Domyślnie wszystkie operacje są wyłączone. Uwaga: dodatek wymaga ustawienia WP Cerber „Wczytaj silnik zabezpieczeń” na „Tryb standardowy”.
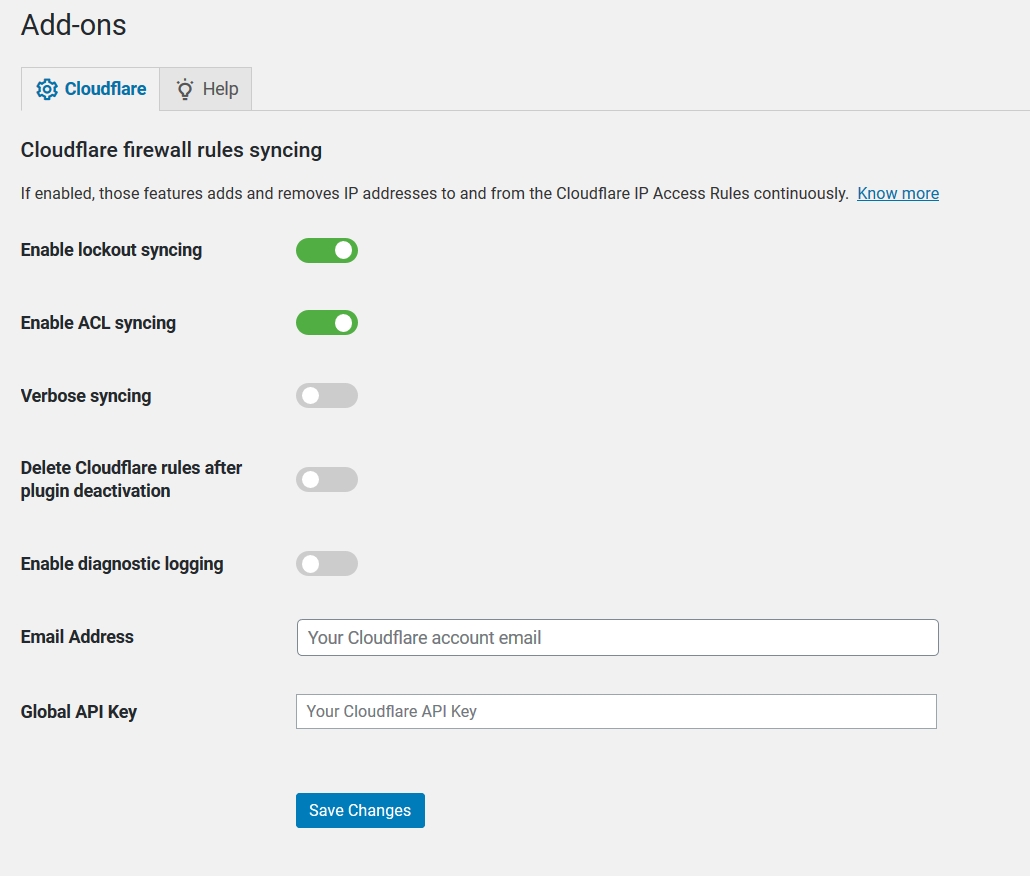
Synchronizacja adresów IP zablokowana przez WP Cerber
Po włączeniu tej opcji lista zablokowanych adresów IP jest stale monitorowana, a reguły dostępu Cloudflare IP są z nią synchronizowane. Po zablokowaniu adresu IP dostęp do całej witryny jest całkowicie zablokowany, ponieważ jest on dodawany do zapory Cloudflare. Bez użycia dodatku zablokowany adres IP ma dostęp tylko do odczytu. Jeśli przypadkowo zablokujesz swój adres IP, zapoznaj się z poniższymi instrukcjami.
Niektóre blokady nie są zsynchronizowane
W następujących przypadkach zablokowane adresy IP nie są synchronizowane i nie są blokowane przez zaporę Cloudflare: użytkownik jest zalogowany, zdalny host generuje błędne żądania, takie jak 404 Page Not Found, po raz pierwszy osiągnięto limit prób logowania, żądania Googlebota pochodzą z domeny googlebot.com.
Uwaga: Celowo nie implementujemy synchronizacji blokad podsieci. Jeśli używasz dodatku do synchronizacji blokad Cerbera, ustawienie WP Cerber „ Blokuj podsieć – Zawsze blokuj całą podsieć klasy C adresów IP intruzów” musi być wyłączone.
Synchronizacja list dostępu IP
Po włączeniu tej opcji wszystkie zmiany na listach dostępu IP WP Cerber są jednokierunkowo synchronizowane z regułami dostępu IP Cloudflare . Na przykład, jeśli dodasz sieć 192.168.1.0/24 do Czarnej Listy Dostępu IP, żaden komputer z tej sieci nie będzie miał dostępu do Twojej witryny. Jeśli przypadkowo zablokujesz swój adres IP, zapoznaj się z poniższymi instrukcjami.
Zapora sieciowa Cloudflare ma jednak ograniczone możliwości. Należy pamiętać, że w przeciwieństwie do WP Cerber, Cloudflare nie obsługuje dowolnych zakresów adresów IP ani sieci CIDR. Obsługuje jedynie pojedyncze adresy IP i sieci klasowe, takie jak A, B i C. Jeśli więc dodasz sieć inną niż A, B lub C do listy dostępu, sieć ta nie zostanie dodana do zapory Cloudflare i pozostanie wpisem lokalnym, w pełni przetwarzanym przez WP Cerber.
Należy pamiętać, że synchronizacja jest jednokierunkowa. Jeśli wprowadzisz zmiany w regułach dostępu na stronie Cloudflare, Cloudflare nie prześle ich do WP Cerber.
Należy pamiętać, że obecnie dodatek nie synchronizuje istniejących wpisów na listach dostępu, które zostały dodane/usunięte przed włączeniem synchronizacji ACL.
Inne ustawienia
Synchronizacja szczegółowa
To opcjonalna funkcja związana z prywatnością, która włącza lub wyłącza zapisywanie dodatkowych informacji jako notatek Cloudflare. Po włączeniu dodatek zapisuje komentarze z list dostępu oraz przyczynę blokady adresu IP w notatce Cloudflare. Włącz ją, jeśli chcesz precyzyjnie identyfikować lub wyszukiwać wpisy według słowa kluczowego wśród reguł zapory sieciowej na stronie Cloudflare. Pamiętaj, że te notatki mogą być przechowywane na serwerach Cloudflare przez nieokreślony czas.
Usuń reguły Cloudflare dotyczące dezaktywacji wtyczki
Jeśli dodatek Cloudflare lub wtyczka WP Cerber zostaną dezaktywowane, wszystkie reguły dodane wcześniej do zapory Cloudflare zostaną usunięte. Należy pamiętać, że po ponownej aktywacji wtyczek usunięte wpisy nie zostaną dodane ponownie.
Jak uzyskać wsparcie
Profesjonalne wsparcie techniczne jest dostępne wyłącznie dla naszych klientów; plany i cennik można znaleźć tutaj . Jeśli korzystasz z bezpłatnej wersji WP Cerber, skorzystaj z dokumentacji online i instrukcji obsługi . W przypadku problemów technicznych włącz rejestrowanie diagnostyczne i sprawdź dziennik Cerbera; znajduje się on w zakładce Narzędzia/Log.
Jak odblokować siebie
Jeżeli przypadkowo zablokujesz adres IP swojego komputera i nie będziesz mieć dostępu do strony internetowej, istnieją dwa sposoby na odblokowanie adresu IP w Cloudflare:
- Użyj swojego urządzenia mobilnego, które łączy się z Internetem za pomocą innego adresu IP (sieci komórkowej zamiast Wi-Fi), aby zalogować się do witryny i usunąć blokadę lub wpis z listy dostępu.
- Zaloguj się na swoje konto na stronie Cloudflare, znajdź wpis ze swoim adresem IP na stronie Zapora/Narzędzia i usuń go ręcznie. Wskazówka: sprawdź swój aktualny adres IP na tej stronie: https://wpcerber.com/what-is-my-ip/
Jak usunąć wszystkie zsynchronizowane reguły Cloudflare
- Włącz opcję Usuń reguły Cloudflare po dezaktywacji wtyczki
- Dezaktywuj i aktywuj wtyczkę Cloudflare for WP Cerber Security na stronie Wtyczki
Jak zainstalować ten dodatek Cloudflare
Dodatek jest standardową wtyczką WordPress i można go pobrać bezpłatnie z naszej strony internetowej, a nie z repozytorium wtyczek wordpress.org. Po aktywacji dodatku upewnij się, że w ustawieniu WP Cerber „Wczytaj silnik zabezpieczeń” jest ustawiony tryb standardowy.
- Pobierz dodatek na swój komputer: https://downloads.wpcerber.com/plugin/wp-cerber-cloudflare-addon.zip
- Zaloguj się do panelu administracyjnego WordPress
- Kliknij podmenu Dodaj nowy w menu administratora wtyczek
- Kliknij przycisk Prześlij wtyczkę znajdujący się obok tytułu strony
- Wybierz pobrane archiwum ZIP
- Kliknij przycisk Zainstaluj teraz
- Kliknij przycisk Aktywuj wtyczkę
Następne kroki, które wzmocnią bezpieczeństwo Twojego WordPressa
Jak ograniczyć liczbę jednoczesnych sesji użytkowników w WordPressie
WP Cerber Security 8.8

I'm a team lead in Cerber Tech. I'm a software & database architect, WordPress - PHP - SQL - JavaScript developer. I started coding in 1993 on IBM System/370 (yeah, that was amazing days) and today software engineering at Cerber Tech is how I make my living. I've taught to have high standards for myself as well as using them in developing software solutions.